How to Block Acrylic Crochet Blanket
If you'll pardon the pun, blocking my crochet projects was always a mental block for me. For years I just went lalalalawhenever a pattern mentioned blocking and studiously ignored it.
Then I tried it… and it wasn't nearly as salary as I thought…
In this post I explain what blocking is, why and how and when to block your crochet projects.
I aim to reassure you too, that it's not as intimidating as it can seem.
What is blocking?
Blocking is essentially a way of using water to shape your crochet (or knit) fabric to achieve a more finished look. The moisture is added, the fabric is shaped and fixed (usually using pins or wires) then left to dry.
It is a very effective way to even out tension and, especially for open work, to really show off the pattern.
Commonly, blocking is used to help flatten areas where work has curled, highlight stitch definition and enhance the look of lace or textured stitches.
It is also used to evenly shape pieces; whether they are panels for a sweater or simple granny squares, finished items look a whole lot better if their parts are neatly shaped.
When a pattern says block to size, it usually means to dimensions (i.e. size and shape). Blocking can increase the size of an item by a small amount (depending on the stitch pattern), but it cannot generally make an item smaller.
Blocking can also help to improve the drape of a finished item.
I guess it could be compared to icing a cake. Without icing the cake will still taste good and fill you up (as an unblocked sweater will still keep you covered up and warm) but a decorated cake will look a lot more appetising than an unfinished one!
There are various ways of approaching blocking, some very quick and simple, some more involved. I will go through these options below.
Note that I use crochet as an example here but these blocking methods are the same for knitted items.
Should I block every crochet project?
Some purists might say absolutely, but honestly I don't think it's necessary in every project. It really depends on what it is and what it's going to be used for.
Items like amigurumi do not need blocking, where as accessories and homewears are more of a grey area. Clothes, for me, are a must!
For example, a simple beanie using easy stitches is going to get shaped and stretched into position as it is worn. If your hat has a complex stitch pattern or there is some issues with tension then it may be worth it but otherwise, imo, life is too short!! 😉
However, I would advise, as a minimum for most finished crochet projects, a quick wash and flat dry.
Crochet projects that benefit from blocking:
- Anything with lace stitches
- Open work items or fillet crochet
- Garments
- Shawls / Scarves
- Squares for blankets (it's a pain but it's worth it!)
- Finished blankets (to get the shape right)
This is not an exclusive list but gives you an idea of the kind of things which would look better after blocking.
Should you block swatches?
If you've read any of my posts on gauge, you will know that I am a fan of always making a swatch for any crochet item which needs to fit.
A swatch should be treated the same way you treat the finished item. So, to me, it follows that if you're going to wash and block the end project, then yes, you should wash and block your swatch!
It's also a good way to see how the fabric will stand up to washing and blocking. Better to shrink a 5 inch swatch than a 30 hour sweater!
Always check the care instructions on your ball band for advice on how to wash your fabric.
Note that if blocking is an essential part of a pattern then the gauge statement should tell you if it relates to the blocked or unblocked stitch pattern – sometimes you will get one gauge measurement for each.
If the gauge doesn't mention blocking, you might want to check in with the designer, especially if it's a lacy pattern where blocking will change the gauge. For most of the designers I make, I give the gauge unblocked (because mostly my designs need very little blocking), but this can vary with different designers.

This post contains affiliate links. This means if you click a link to a product and go on to make a purchase, I receive a small percentage of the sale at no extra cost to you. You can read my full affiliate disclosure here. As an Amazon Associate I earn from qualifying purchases.
Should I block my project before I sew in the ends?
The general consensus is that blocking before you sew in ends gives a better finished look, but it really depends on your project.
If you sew in ends and then block your work, the sewn in ends may cause some resistance meaning you don't get an even look. If you sew in your ends after you have blocked your work then you know you are working with the final tension.
How to block your crochet project
Blocking involves dampening the crochet fabric, stretching it out to shape, pinning it out and allowing it to dry.
Always remember to use rust proof pins when blocking to avoid getting orange marks on tour work!
I like these T-Pins (they are SHARP so be careful!!), but you can also use these cool knit blockers (which I haven't used personally but they are on my list!), special blocking wires or even thread. More about that later!
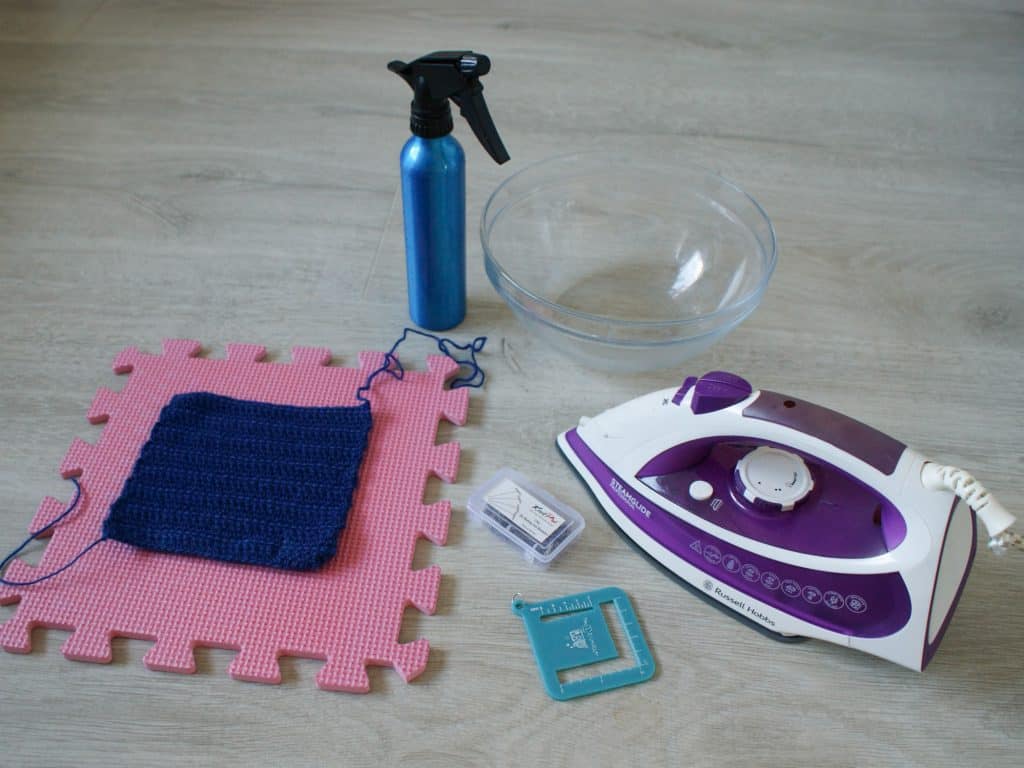
First lets look at the different ways you wet your fabrics and which version to use when.
Soak blocking
As the name suggests, soak blocking is a kind of 'wet blocking' which involves completely submerging your project in cold or room temperature water. You should allow the fabric to sit for around 30 minutes to allow the fibre to fully soak up the water.
Soak blocking is most commonly used with natural fibres, including wools (often in combination with a wool wash), cottons or bamboo and other superwash animal fibres.
Once you have allowed the fabric to fully soak, carefully squeeze out the excess water and lay it flat on a towel. Gently roll up the fabric in the towel and give it a press to take most of the water out.

This method is preferred to ringing out the fabric as it protects all the fibres from damage or felting.
Once you've taken off the excess water, it's ready for the blocking bit (i.e. the pinning out).
Soak blocking won't work with acrylic yarn because the plastic fibres are water resistant so the whole endeavour will be a bit pointless!
Spritz Blocking
Spritzing is another, form of wet blocking. It is helpful for items that only need a light block and uses a quicker way of getting moisture into your fabric.
Using a spray bottle, spritz clean water over your crochet, making sure it soaks through to the back of the fabric. Do this on a towel!
Your fabric will be damp but not soaked and ready to pin out.
Heat or Steam Blocking
Sometimes also called 'dry blocking', this method involves pinning out your crochet project first. Then you add steam to relax the fabric, before leaving it to dry.
If you're blocking a garment, you have the option to steam it whist on a mannequin.
Steam is an alternative way to get a small amount of moisture into your fabric. The added element of heat can be used to create shape and additional drape on your fabric.
Ideally you would use a garment steamer because you can easily control the heat, though a steam iron works well too. Hover the steam gently an inch or so above the fabric.
Heat blocking is the recommended method for blocking acrylic yarn and fibres which don't do well with wet blocking.
A warning here though. Do not apply direct heat to your fabric. In particular to acrylic as it can melt the fibres.
It's a fine line between using heat to 'break' and manipulate acrylic and irreversibly flattening it. If you've ever ironed anything made from acrylic yarn (Yep, I have done this!) then you will see that the stitches flatten and don't bounce back!
The same goes if you are working with any other delicate fibre. Keep the heat at a distance!
With steam blocking, you will only get the fabric damp but it it is still important to pin it out until it is completely dry so it retains the shape.
How to pin out crochet or knit fabric for blocking
Whether you are using a wet or dry blocking method, you will need to stretch and shape your project and secure it in place, most commonly by using pins.
This is the bit that always caused me stress, so here is my advice on how to approach it.
Using Pins and a blocking board
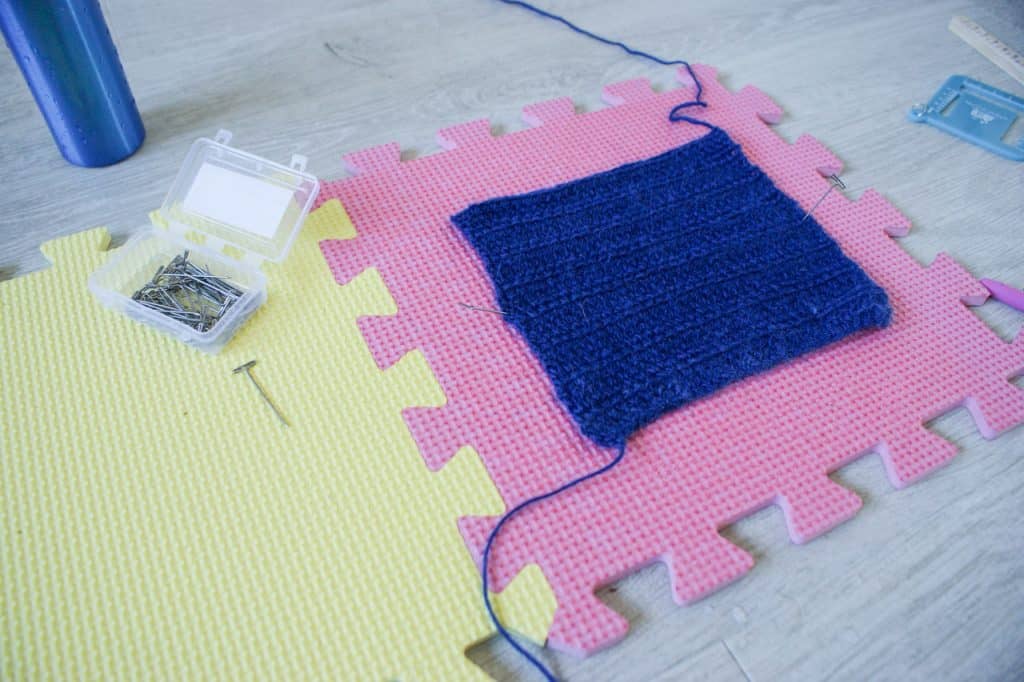
Take your item (I've used a swatch to demonstrate) and lay it out on a clean blocking board or mat.
Note that blocking boards with measurements can be useful for blocking to size, but they aren't essential. I have used an old yoga mat in the past and in this example am using a kids foam puzzle style play mat!
You might want to lay a clean colourfast towel underneath your work when blocking it as this will allow it to dry quicker (most blocking boards are water resistant so the underside can take much longer to dry).
If you do use a towel be sure that it is secured and does not slip about as you pin!
Also take care that your pins do not go through the board and scratch or damage the surface underneath. Keep your pins away from pets and children. (My cat likes to try chew on the tops and it terrifies me!)
Starting in the centre of your work, use your fingers to stretch out the fabric to the tension you are looking for and work out towards the edges.
It may feel counterintuitive, but do not put your first pins in the corners. Pin in the centre of the sides and keep stretching the fabric out towards the corners.
In the pictures I am using knit pro T-pins which are super sharp, robust and easy to use, however any rust-proof dressmakers pins should work too.
Once you have the pins in the centre of the sides, continue to evenly stretch the fabric, then you can add the pins in the corners.

You will see here that there are dips in the fabric between the pins. Carry on using your fingers to manipulate that fabric and place the next pins half way between the previous pins.
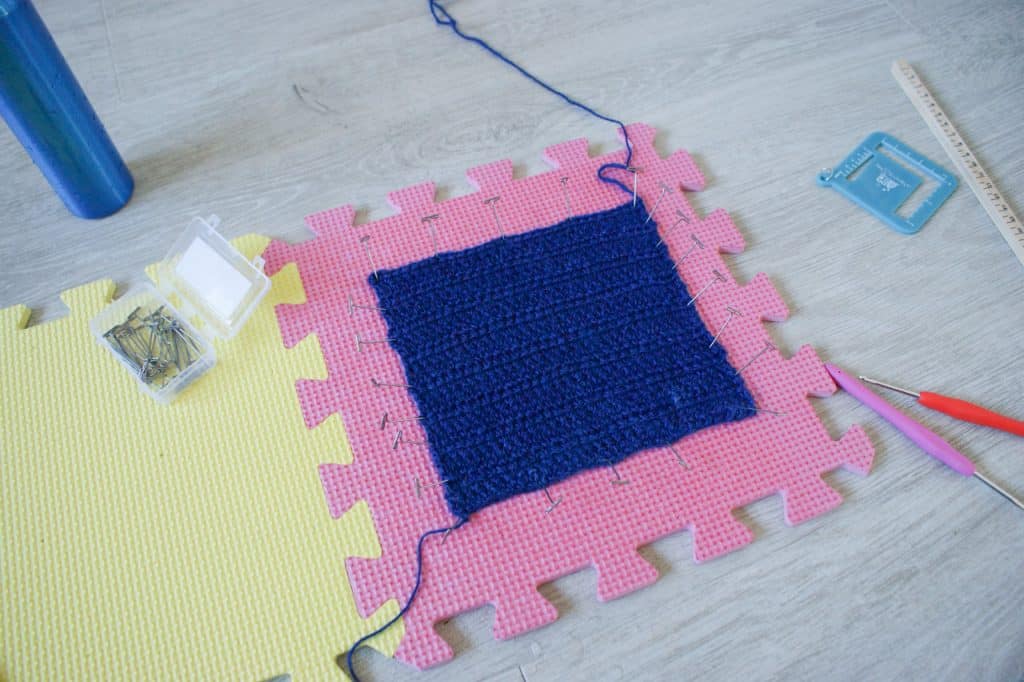
The next pin(s) should go half way across the gaps between pins and so on until you have your straight edges.
I place the pins at an angle away from the edges so that the fabric doesn't slip.
If you are working with a larger or more complex shape, this process can take a while as you may need to adjust pins as you stretch and shape your work. Especially if you're working with lace patterns.
Use a LOT of pins for perfect edges!
Once your damp fabric is pinned out simply leave it to air dry!
I have recently discovered a product called Knit Blockers, which are essentially a group of pins lined up – like a comb, if each tooth was a pin. I haven't used these yet, but they look like a great way to avoid the little peaks you sometimes get with individual pins!
How to pin out crochet garments when blocking
When pinning out finished garments (rather than flat pattern pieces), you may just want to focus on specific areas which may need more shaping.
In the picture below, which shows the Any Yarn Will Do Cardigan in the process of being pinned out to dry, I wanted to focus on getting a nice straight hem, even button band and neckline, so focused on those areas. The sleeves and the body needed very little attention.

This is the same regardless of whether you use the soak, steam, spritz or dry blocking methods.
The precise approach to pinning will depend on the shape and style of the garment you're working with, but I wanted to include this image to give you an idea.
As I already alluded to, there is more than one way to shape your project when blocking it. Below are a few great alternatives to pinning. In each case, shape the work and allow it to dry naturally.
Blocking Wire
Blocking wire is an alternative for bigger pieces or more delicate garments. It is great for shawls and items with straight sides (triangle shawls, blankets etc.).
Blocking wires are simply long sturdy, but flexible pieces of wire.

To use them, you weave the sides of your fabric onto the wire (think of the tip of the wire as a yarn needle) at regular intervals, spreading one side out evenly over the wire
This gets rid of those pesky peaks and troughs you sometimes get with pins.
First you will add 1 wire on each side of your project. Then either pin the wires out flat to shape or hang the piece from one of the wires, depending on the shape you're working with.
It's such a genius way to get straight edges!
Blocking wires come in different gauge / diameter suitable for different weight projects; a chunky blanket is going to need something more substantial than a lace shawl!
If you have an item with a curve in, then the thinner wires will bend to accommodate this; perfect for those beautiful crescent shawls!
Thread, Cotton or String
Strong thread without any stretch (kitchen cotton, or embroidery thread for example) can be used as a DIY version of blocking wires.
You use a yarn needle to weave the thread through the sides of you work like you would with the wire.
Here's the catch – you need to securely pin down one end of the project and then wrap the other end of the thread around something (a table or chair leg?) so that the tension is taught enough to hold the shape.
This can be a logistical challenge and a potential trip hazard but if you have a set up you can get to work that's great.
This technique works best for irregular or short pieces. You can pin the thread out into shapes so it gives that extra bit of flexibility.
I have seen people set up a peg like system where they twist the peg to tighten the string. Like tuning a guitar!
When using wire or thread, make sure you thread it in as close to the edge as possible without creating lumps and bumps.
Blocking Peg Boards
If you make a lot of blankets then pegged blocking boards could be the thing for you.
They are essentially boards with holes drilled into them at regular intervals, like peg boards, into which tall solid doweling type 'pins' (pegs) will fit.

Say you are blocking a granny square blanket, you can use the pins to mark out the square size then loop the corners (and maybe one or more points along the sides) over the pegs so that each of your squares is the same size.
A bonus feature of these boards is that the pegs are usually really long so you can block multiple squares at once. Don't use too many though as the ones in the centre won't dry properly!
Fibre content and blocking
Throughout the instructions, I have given some guidance about the best method for different fibres but I wanted to take a moment to clarify this.
Different fibres respond differently to different blocking methods, so here is a quick summary of how to block the most common fibre groups.
- Wool and animal fibres respond well to all styles of blocking
- Cotton is hardy and can be resistant to blocking. Wet blocking will give best effects, but sometimes that curl needs some starch to beat it into submission!
- Acrylic (in most forms) can be blocked with steam, but if it is exposed to direct heat it can 'break'. This can be a great way to soften up a blanket and increase drape. However, it is irreversible so if you want to try it then you need to know there is no going back!! Practice on a swatch!
Is blocking permanent?
Generally speaking, blocking is not permanent. But I would add some caveats to that
When you wash your crochet project, it you are essentially soaking it, so it's like starting the soak blocking process over again. After the wash, you will need to dry it flat and pin it out to shape again.
That said, the extent to which the blocking is 'undone' when you wash your crochet item will depend on a number of factors, including the stitch pattern and fibre content, as well as the original blocking method used.
For example, an intricate, open lace wool shawl will need more blocking after washing than a cowl made with acrylic yarn using double crochet throughout.
That's a simplistic example which gives you an idea of the variation. It's hard to be definitive about which projects will retain the best stitch memory, but it's the kind of thing that becomes more intuitive with experience. So give it a try!
I also think that the longer you wear a blocked crochet project, and the more often you re-block it, the less blocking it will need the next time. But that's just my thoughts on the subject, others may see it differently.
So there we have it. I hope that this has given you a good overview of the blocking process, rather than confusing you more!
If in doubt, try it with a swatch!!
I'd love to hear how you get on if you finally give blocking a go. I have learned that it is really worth the effort (I concede that it can be a bit of a palava) for that extra finished look.
Happy blocking!
Dx
How to Block Acrylic Crochet Blanket
Source: https://doradoes.co.uk/2020/02/22/blocking-explained-when-and-how-to-block-crochet-projects/

0 Response to "How to Block Acrylic Crochet Blanket"
Post a Comment